
Adopting AMP can help build and sustain a high performance website, with software engineering best practices built into every AMP URL, saving you time, effort and resources when building your website.
In addition to building a fast loading and optimized website with the help of AMP, it’s important to make the most of your website by monitoring its success across various metrics. To do so there are some important measurement tools available which can help provide an understanding of how your site is performing.
These tools, which are applicable to AMP or non AMP URLs alike, help uncover how visitors access your site, they help determine user behavior on your site and they assist site owners by highlighting suggestions and opportunities, to ensure modern web development best practices are followed.
Google provides many of these tools, making them freely available to site owners, including:
- Search Console: for understanding how your sites behave in search, and highlighting any issues.
- Analytics: for understanding how users are interacting with your site, where are these visitors coming from and what’s their behaviour.
- PageSpeed Insights: for understanding how your site is performing across various areas, accessibility, page rendering, best practices and more.
- Tag Manager: for users to safely insert and manage code snippets on their site.
- AdSense: for helping you to implement ads, with extensive reporting tools.
- Optimize: create personalized experiences and run website tests.
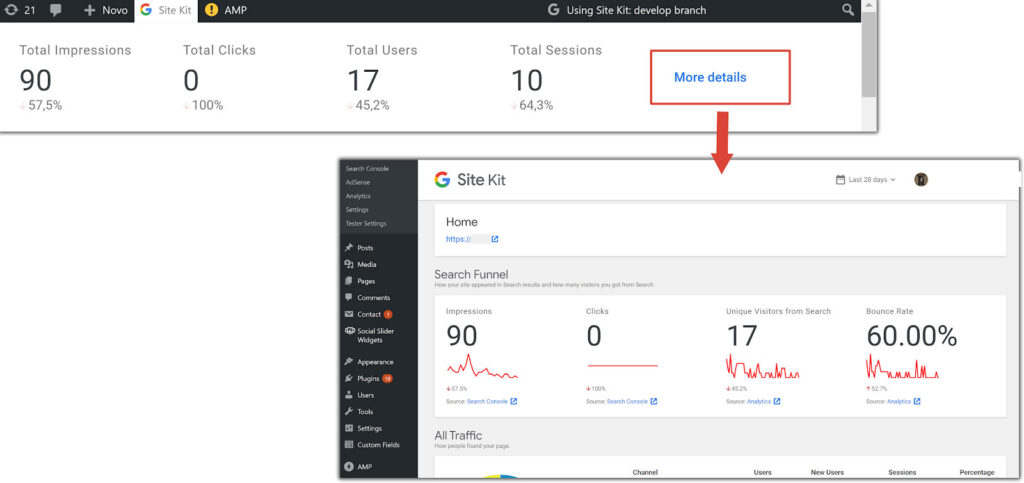
Site Kit is a WordPress plugin developed by Google which brings together the best of Google monitoring tools directly to your WordPress administrator dashboard. Providing useful graphs, statistics, milestone notifications and performance indicators, it’s an open source plugin that’s essential for users looking to achieve success on the web.
In this post we review how to take advantage of Site Kit for your AMP site, while providing insights to the Google tools and products and how they apply to your AMP enabled site. Let’s get started below:
Search Console
Search Console is an important tool that helps users discover how their site is performing from the perspective of Google Search. It provides site warnings, areas for potential improvements and downtime notifications. In short, Search Console is a tool all websites should leverage.

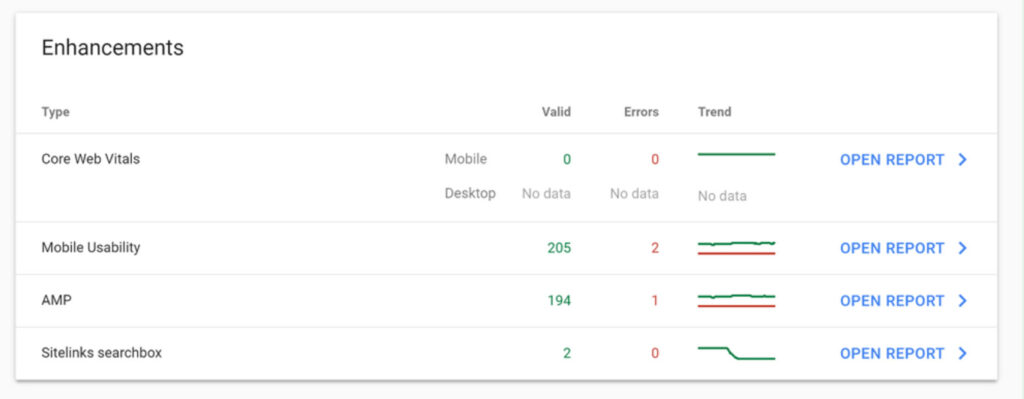
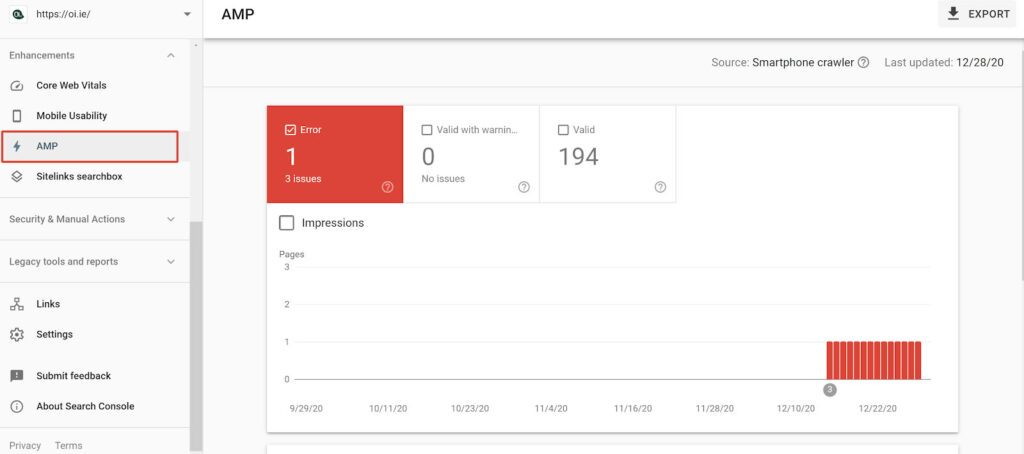
Search Console with AMP: Search Console includes a dedicated AMP report which details validation errors highlighting impacted pages and the current status from a sample set of AMP URLs. We’ve recently published a blog post on Search Console with AMP which contains common errors and different checks you can perform should you encounter any such notices.

Search Console via Site Kit for your AMP site: Using Search Console on AMP sites is no different to using it on non-AMP sites. Typically when adding a site to Search Console users must verify their site to prove ownership. Site Kit makes verification easy, in just a few clicks you can have your AMP first site verified, and ready to start recording how users access your site.
To connect Search Console to your site via Site Kit simply follow the steps on the plugin website documentation. Once Site Kit is successfully connected Search Console will start collecting data for your AMP enabled site.
Benefits of using Site Kit to access Search Console for your AMP:
- It’s easy to set up, with no requirement to upload a verification file or insert a meta tag for domain name verification.
- Users can view Search Console data directly from within your WordPress admin dashboard.
- You can view data on any AMP URL visited using the Site Kit admin toolbar, while logged into your site.

Google Analytics
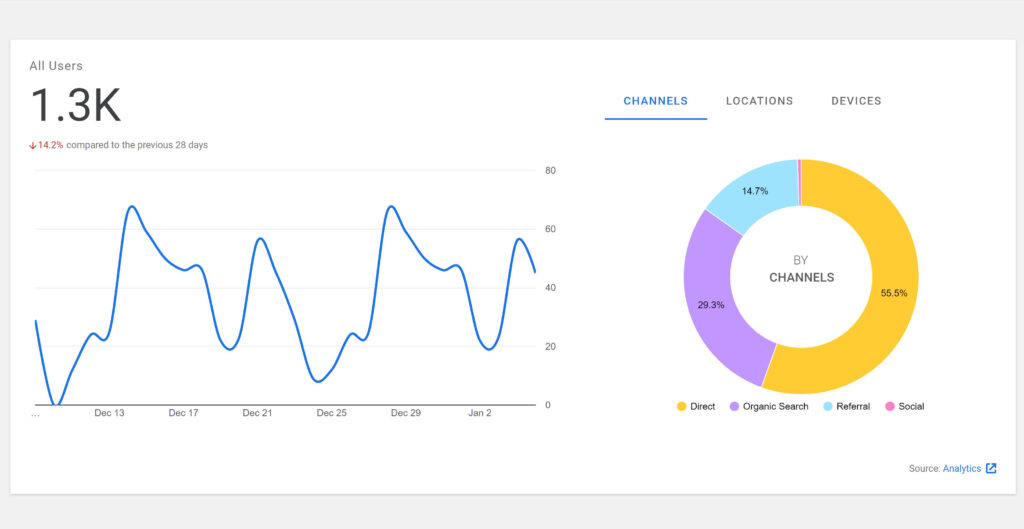
Google Analytics is a service which helps site owners track and report on their website traffic. Users can analyze where their visitors are coming from, study how they are accessing your site, view real time reports and compare traffic across different reporting periods or metrics. It’s a vital tool for researching the traffic to your site and investigating its behaviour.
Google Analytics on AMP sites: Google Analytics is one of the many supported AMP Analytics vendors. As with all vendors making use of amp-analytics this requires a JSON-based approach for AMP URLs, as opposed to a traditional JavaScript tracking snippet. Google provides a range of different supporting materials for AMP users, helping users to report on AMP URLs individually and ensuring users have the guidance required to set up session unification between their AMP site and their site when served from AMP Cache.
Implementing Google Analytics via Site Kit for your AMP Site: While the AMP plugin features an Analytics tab where users can implement their preferred analytics vendor tracking snippet, the Site Kit plugin makes the process easier if using Google Analytics.
In order to setup Google Analytics for your AMP site with Site Kit follow the steps below:
- Install and activate Site Kit if not already done
- Navigate to “Site Kit > Settings > Connect more services”
- Click on “Set up Analytics”
- Select your Google account and follow the OAuth setup flow if requested to do so (If you have granted permissions previously this may not be necessary).
- On the next screen you’ll need to define an “Account”, a “Property” and a “View”. You can also choose to create new versions of any of the above if preferred.
- Select your preferences from the additional configuration options (which apply to both AMP and non-AMP URLs).
- Press “Configure Analytics”
- That’s it, your traffic is being measured with the correct Analytics snippet on both your AMP and non AMP URLs.
Note that if you already have an existing Analytics snippet on your site Site Kit will use this snippet to prevent duplicate tracking code. You can remove this manually placed snippet before setting up Site Kit if you prefer to select an alternate Analytics property.
Features of using Site Kit to connect your AMP site with Google Analytics:
- It’s easy to set up, a few clicks on you’re done.
- Analytics data can be viewed within your WordPress admin dashboard. Filtering for different reporting periods is also available.
- New Google Analytics accounts, properties and views can also be created within Site Kit, with no need to visit analytics.google.com.
- Theme updates won’t result in manually placed snippets being overwritten.
- Sessions between your AMP origin site and AMP cache are attributed to your own domain via AMP Linker.
- Users can take advantage of customization configurations, including the below, which all apply to AMP URLs and non AMP URLs alike:
- Anonymize IP addresses
- Exclude logged in users from Analytics reporting

AdSense
AdSense is a free and simple way to earn money by displaying ads next to your online content. You can show relevant and engaging ads to your site visitors and even customize the look and feel of ads to match your site. It’s a great way to monetize and get something back from the great content you’re producing.
AdSense with AMP: AMP Ads require different ad code from the typical JavaScript based ad code. Since AMP ads provide improved performance over regular ads, there are opportunities to maximize your revenue without having to perform various site optimizations, which can be costly and take up valuable resources.
The AdSense platform provides the required code snippets to start serving ads on your AMP website. The AdSense Help Center also provides extensive documentation and supporting material. This includes guides on setting up Auto ads for AMP and AMP reporting.
AdSense via Site Kit: At present Site Kit supports the placement of the Auto ads snippet on your AMP site. If you haven’t used AdSense on your site previously, Site Kit can also submit your WordPress site for approval, along with directing you to the signup process for AdSense if you’re new to the platform.
For those already using AdSense on their AMP site, Site Kit can recognise existing ad code and provide you with valuable insights on your sites monetization performance. This can be done without placing any Auto ads for AMP code on your site if desired.
In order to setup AdSense for your AMP site with Site Kit follow the steps below:
- Install and activate Site Kit if not already done
- Navigate to “Site Kit > Settings > Connect more services”
- Click on “Set up AdSense”
- Select your Google account and follow the OAuth setup flow if requested to do so (If you have granted permissions previously this may not be necessary).
- Follow the simple to follow on screen instructions, which may vary depending on whether you have existing AdSense code on your site.
- Proceed until you encounter a “Congrats on completing the setup for AdSense!” notice. At this stage you’ve managed to connect the AdSense module on your site, which allows you to view your AdSense reports.
Depending on your AdSense account and site approval status and your configuration on ad code placement you may need to wait some time for ads to be served on your AMP URLs.
Features of using Site Kit to insert AdSense code on your side:
- You can apply for an AdSense account directly within Site Kit, whether you’re using AMP or not.
- Site Kit can also submit your website for approval on the AdSense network.
- The plugin can insert Auto ads for AMP code on every page of your site, including your AMP URLs.
- If you prefer Site Kit to not place Auto ads code you can do so with the plugin’s AdSense configurations, while still viewing reports on your AdSense performance.
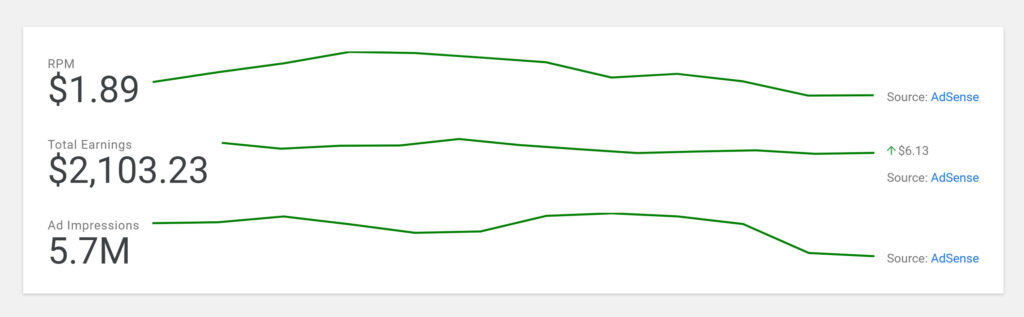
- AdSense data can be viewed within your WordPress admin dashboard, with different reporting periods available in an easy to digest graph.
- If you’re looking for deeper analytics and reporting there is a click through link to more advanced details on the AdSense platform.

Tag Manager
Google Tag Manager allows users to manage all your website tags without editing website code. Whether it’s third party snippets, advanced tracking code, marketing tools or even GDPR cookie notices, it’s a powerful method of inserting and managing code inserts and tags on any website.
To keep track of all tags placed on a site each tag grouping is known as a container.
Tag Manager with AMP: For performance reasons there are some restrictions on custom JavaScript in AMP URLs, Google Tag Manager however provides dedicated AMP containers to comply with these AMP principles. This means users can implement tracking snippets specifically for their AMP URLs, while using a standard web container for non AMP URLs.
You can view a collection of tags available for your AMP URLs at this resource. We also have a previous blog post with more information on Tag Manager with AMP.
Implementing Tag Manager via Site Kit for your AMP site: Site Kit allows you to easily select an AMP container for your site. If you’re using paired AMP (via the plugin’s Reader or Transitional template modes) you can also select a regular web container for your non AMP URLs.
The steps involved in setting up Tag Manager for your site are below. The setup steps may vary slightly if you don’t already have a Google Tag Manager account:
- Install and activate Site Kit if not already done
- Navigate to “Site Kit > Settings > Connect more services”
- Click on “Set up Tag Manager”
- Select your Google account and follow the OAuth setup flow if requested to do so (If you have granted permissions previously this may not be necessary).
- Select your preferred Tag Manager account, web container and AMP container from the available dropdown options. Alternatively you can create a new account or container.
- Press “Confirm & Continue”
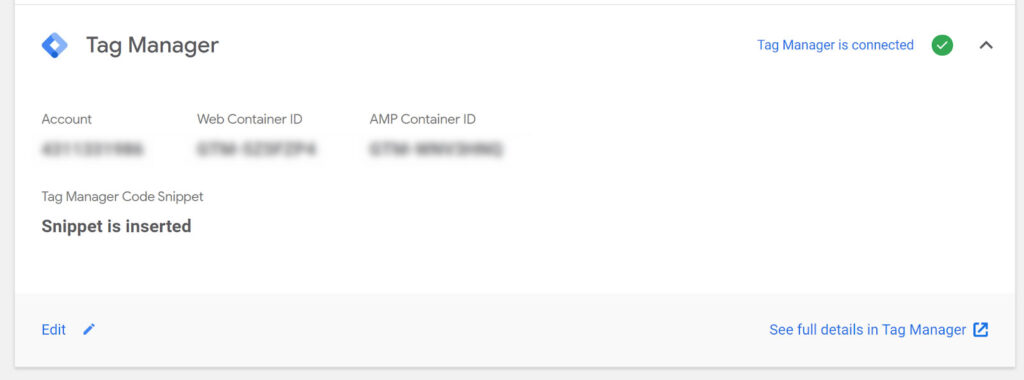
- When you see a “Congrats on completing the setup for Tag Manager!” you’ve managed to successfully set up the Tag Manager module. You can then proceed to tagmanager.google.com if you’d like to insert any new tag on your site.
Note that Site Kit inserts your container code snippet. Once you’ve managed to connect Tag Manager via Site Kit you can then add individual tags at tagmanager.google.com. After accessing your connected containers and added your tags be sure to “Publish” the latest version.
Features of using Site Kit to connect your AMP site with Tag Manager:
- Site Kit can ensure the correct container code is placed on your site, with a web container inserted for your non AMP URLs and an AMP container inserted on your AMP URLs.
- Users can create new containers within Site Kit.
- If using AMP in Standard mode only the AMP container will appear when configuring Tag Manager.
- After connecting Tag Manager via Site Kit users can easily add new Tags by visiting tagmanager.google.com.

PageSpeed Insights
PageSpeed Insights analyzes the content of a web page, before then generating suggestions to make that page perform better across a variety of metrics based on Google’s Core Web Vitals. These performance metrics provide a common set of signals critical to all web experiences.
PageSpeed Insights with AMP: Thanks to the AMP plugin many of the technical difficulties in achieving great PageSpeed Insights are already achieved, with common software engineering best practices built into every AMP valid URL.
If you’re using paired AMP, via the plugin’s Reader or Transitional modes why not compare the performance of your AMP URL versus your non AMP URL at www.web.dev, performing tests on both versions of your site.
Implementing PageSpeed Insights via Site Kit for your AMP Site: Setting up PageSpeed Insights for your AMP site couldn’t be easier with Site Kit. Follow the steps below in order to view your websites Core Web Vitals across both
- Install and activate Site Kit if not already done
- Navigate to “Site Kit > Settings > Connect more services”
- Click on “Set up PageSpeed Insights”
- Select your Google account and follow the OAuth setup flow if requested to do so (If you have granted permissions previously this may not be necessary).
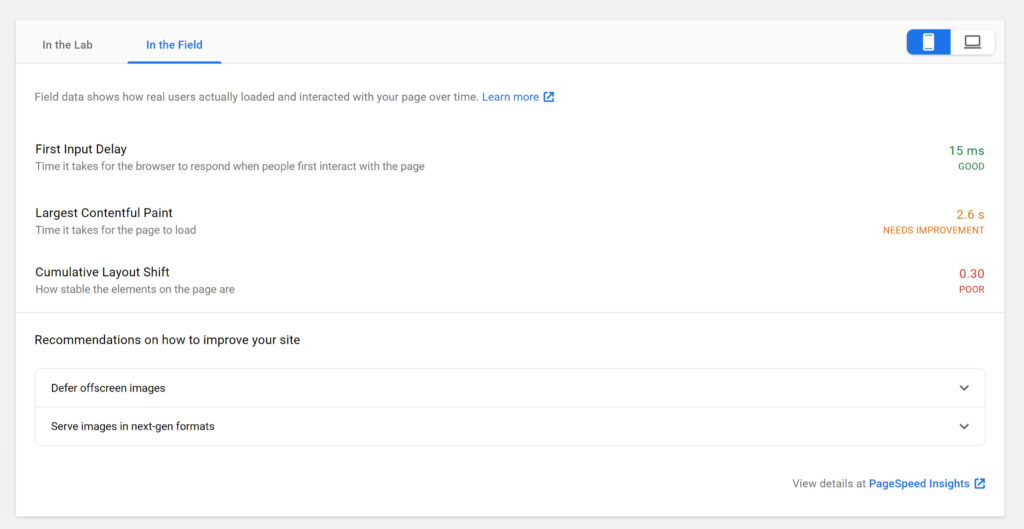
- After setup you’ll be directed back to your main Site Kit dashboard. You’ll notice a “Page Speed and Experience” section, below which you’ll find a useful report on your current site’s performance, measured across both lab and field data. There’s also an option to perform a test on your desktop site, with your mobile site being the one used for initial reporting. If you’re looking for more complete performance scores click on the “View details at PageSpeed Insights” link.
Note that if you’re using paired AMP (via the plugins Reader or Transitional mode) your non AMP URL will be the one reported on if you don’t have the “Mobile redirection” option enabled within the AMP plugin.
Features of using Site Kit to connect your AMP site with PageSpeed Insights:
- You can view the performance ratings of your site from your WordPress dashboard
- Users can benefit from recommendations on how to improve your site
- The data summarizes your website based on both lab and field data
- There are options to analyze performance on both module and desktop
Optimize
Google Optimize shows you which site experiences engage and delight your customers, and gives you the solutions you need to deliver them. Natively integrated with Google Analytics you can quickly understand how your website can be improved, while performing experiments before rolling out any wholesale changes.
Optimize with AMP: Optimize can be used in tandem with AMP URLs. If you use <amp-experiment> to run experiments on AMP documents, you can use Google Optimize to report on the performance of your variants and to select a leader based on your objectives.
Implementing Optimize via Site Kit for your AMP Site: To setup Google Optimize via Site Kit follow the steps below. Before setting up Optimize within Site Kit you should have an existing Optimize account and some experiments already setup.
- Install and activate Site Kit if not already done
- Connect the Analytics module (see steps above)
- Navigate to “Site Kit > Settings > Connect more services”
- Click on “Set up Optimize”
- Insert your “Optimize Container ID” – You’ll find this from your Optimize account at optimize.google.com
- Input your “AMP experiment settings” in the respect text area. As above you’ll find this at optimize.google.com.
- Press “Configure Optimize”
- After setup you’ll be directed back to your main Site Kit dashboard. You’ll notice a “Congrats on completing the setup for Optimize!” notice.
Note that after setting up Optimize with Site Kit you can navigate to optimize.google.com to configure your various experiences. If you require assistance make use of the Optimize Help Center.
Features of using Site Kit to connect your AMP site with Optimize:
- You can use the plugin’s input boxes to verify a valid Optimize container ID and JSON format experiment
- Site Kit ensures the required AMP scripts are loaded on your AMP URLs
—————————————–
I’m stuck, I need assistance
If you’re having any difficulties setting up one of the various Google services within Site Kit fear not, the friendly Site Kit team can assist at the plugins WordPress support forums. Before opening a support topic check that your question hasn’t already been answered on the plugin’s website.
Be advised that the Site Kit team can only assist with plugin related queries, for Google product specific questions use the respect help centers below.
- Search Console
- Analytics Help Center
- AdSense Help Center
- Tag Manager Help Center
- PageSpeed Insights FAQs
- Optimise Resource Hub
Ongoing Developments
The AMP plugin team works closely with the Site Kit team at Google to ensure compatibility with AMP for the various Google products Site Kit supports. With many new and exciting features planned for Site Kit in 2021, it’s a great time to get started implementing your favorite Google products on your user first AMP site – with the help of Google’s Site Kit.
You can find out more about Site Kit on the plugin’s WordPress listing, or on the plugin’s website. If you like to get involved why not submit a feature request on the plugin’s GitHub repository where you can also check out upcoming features and enhancements.
Can AMP increase Ad Revenue than normal site?
I do not know if it’s just me or if perhaps everybody else experiencing issues with your blog.
It looks like some of the written text on your content are running off the screen. Can somebody else please comment and let
me know if this is happening to them too? This might be a problem with my browser because I’ve had this happen before.
Many thanks
Hi there,
Thanks for your question, you should check if your theme is AMP-compatible, if not you have two options: use the reader mode or switch your site to an AMP compatible theme, if you need more with your issue? Please contact us at the support forum: https://wordpress.org/support/plugin/amp/