
(Editorial note: This post was contributed by Pradeep Sonawane, Director of Engineering, rtCamp. rtCamp is an AMP Expert and ecosystem partner.)
We at rtCamp, recently designed and implemented a full site for amp-wp.org with an AMP-first approach. With this article I am hoping to share our experience and unique perspective. Besides the technical details of the project’s execution, we want to outline a general workflow and recommendations that will help you build your first fully AMP website. Grab a coffee. This is going to be a long one!
AMP-first sites
What are AMP-first sites?
Similar to how we have mobile-first design, as oppose to days where sites used to have a different m.example.com portal to show to users browsing from mobile devices, we expect there is scope for websites to evolve from having a seperate AMP version to being AMP-first all the way using the official AMP plugin configured in Standard Mode.
The AMP plugin integrates AMP content creation seamlessly with standard WordPress content creation workflows. In particular, an AMP-first approach allows WordPress sites to be built entirely with AMP, without an alternate AMP version of “regular” pages.
Just like a genuinely mobile-first site does not have an m.example.com subdomain for the mobile version, an AMP-first website does not have `?amp` in its URL; yet, it reaps all the benefits of AMP.
Now we are clear about what AMP-first means, let’s find out how the AMP plugin helps us get there.
AMP Plugin’s Template Modes
AMP is a powerful and cost-effective tool that makes it easier to build web experiences that are consistently fast, beautiful, and highly engaging across distribution platforms. The official AMP plugin massively reduces the developer effort required to bring AMP’s benefits to WordPress. Considering the WordPress ecosystem’s size, the AMP plugin provides three template modes, namely Reader, Transitional, and Standard, with increasing development efforts and AMP benefits.
The plugins Reader mode is the easiest way to get AMP into a site. If you are unsure about your theme and plugins’ AMP compatibility and don’t have the time to dig deeper, you should start with Reader mode. This mode is likely to work without any customization on your part, ensuring AMP versions of your content running alongside your canonical (non AMP) version, with options to choose a different theme for your AMP content.
However, if using an AMP compatible theme we highly recommend giving Transitional mode a try, even if you have a hard deadline to meet. The reward is design parity between your AMP and non-AMP pages. While it is true that the outcome of Transitional mode depends on your WordPress site’s code & content to some extent, the AMP plugin team is actively working to ensure that the AMP Plugin automatically resolves most issues. For problems that require manual intervention, developer efforts are still significantly reduced.
That leaves us with Standard mode, which goes one step further than Transitional mode. It is also what we refer to as “AMP-first.” The Standard mode makes all your pages AMP that gives your visitors all AMP benefits across all devices.
Going back to the mobile subsite analogy, think of using the Reader & Transitional modes as mobile-versions (m.subdomain) of a site, while Standard mode is like building a unified, responsive website. If AMP pages offer better performance, why not have them for all visitors across all devices?
AMP-first in action
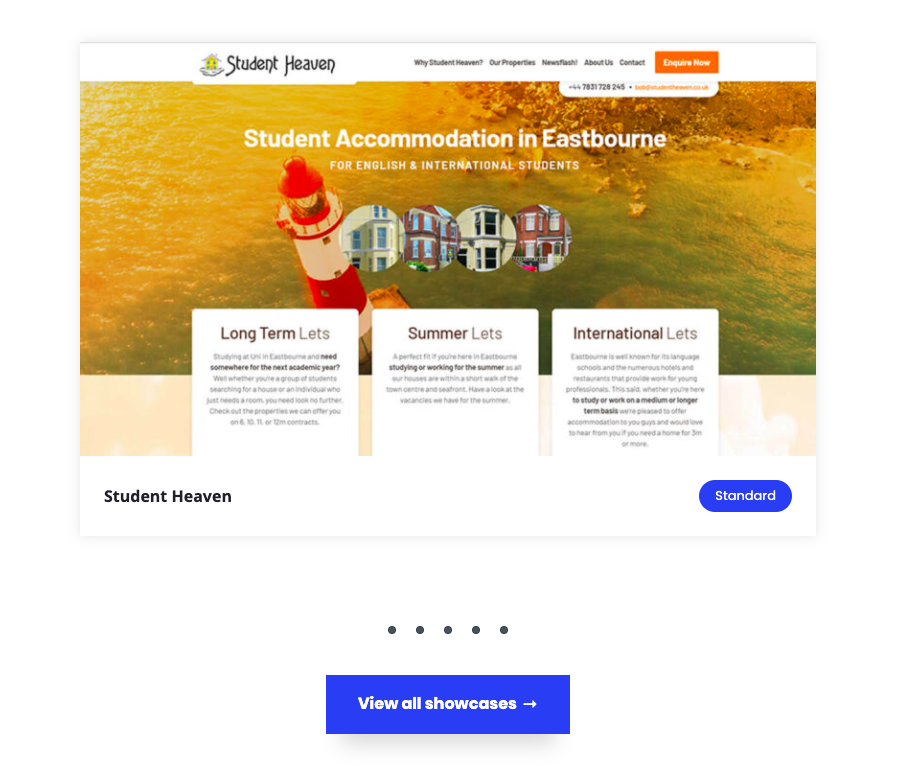
You can experience an AMP-first site by visiting amp-wp.org, or view examples of what end users of the plugin have build by visiting the showcases page. Performance is indistinguishable across platforms, as all pages are fully AMP compatible. Complex elements such as the carousel on the homepage (Showcase section) and the auto-suggest feature in the reference doc search box also work similarly across all devices.
Next, let’s delve a bit deeper into the process of building the AMP-first site before we explain what we did for amp-wp.org.
The Process of Building AMP-first Sites
Like any web development project, there are some variations in the process — it depends on whether you are trying to make an existing site AMP-first or building a new site.
Generally, to make a site AMP-first — which means using the AMP plugin’s Standard template mode — we follow the following steps:
- Install and activate AMP plugin on your WordPress site. Preferably do this on a staging environment if you are working on an existing site.
- Activate Transitional mode during the plugin walkthrough. This mode is a good starting point in this case, as it doesn’t affect your “normal” output.
- Run AMP validation by visiting all critical pages on your site from the browser. If you have access to the command-line interface, you can run the `wp amp validation run` command on the entire site. However, it would be good enough to validate a representative URL of different content types on a large site. For example, you can validate the homepage, all pages reachable from your primary menu, one URL each for every public custom post type’s single/archive output, etc.
- Go through the AMP Validation Error Index. There you can see all errors grouped by error type as well as URL.
- Review and action any highlighted errors. This sometimes involves replacing plugins with their AMP-compatible plugin alternatives. The plugin can also automatically remove any non AMP valid features or elements of your site from running on your AMP URLs if you wish. Generally, using an AMP-compatible theme resolves quite a few errors.
- After fixes, go to step 3 to re-run AMP validation.
- Once all validation errors are addressed, it’s better to view the entire site in paired-browsing mode. This can help you tweak your CSS. Make sure you try paired-browsing in responsive mode.
- Once no AMP validation errors remain, or if leftover errors are acceptable to you and you are happy with what you see in paired-browsing mode, it’s time to switch to Standard mode.
That’s it. You have built your first AMP-first website! It’s time to measure your site’s Web Vitals to appreciate your hard work.
If, after step number 6 above, you have errors that are not acceptable to you — and assuming you have replaced incompatible themes and plugins with AMP-compatible counterparts wherever possible — you may need to do custom development. The AMP Ecosystem has many AMP Experts to help you with custom development if you need it.
When custom developing any feature that involves front-end markup, if you are a developer, try using AMP’s ever-growing library of ready-to-use AMP components.
AMP Component Catalogue
If you are new to AMP components, think of them as jQuery plugins or React components. Once you become comfortable with the baseline framework, next time you need to add a UI functionality, you look for readymade solutions that you can include in your project and readily use. AMP components are a similar thing where you get different UI and functional solutions in ready to use condition.
Some of the more popular components popular with users include amp-sidebar, amp-mega-menu, amp-carousel, amp-list, etc. Many common effects can be achieved using either a single component or a combination of components. For example, a FAQ-style expand/collapse feature can be achieved by amp-accordion or by combining amp-bind with amp-state to expand and collapse certain HTML elements on click or tap events.
When making an existing site AMP ready, you can start with the AMP Readiness Chrome extension to analyze third-party technologies such as analytics and advertising services a site is using. This extension can help you plan your efforts in a better way.
We recommend removing non-critical incompatible third-party JavaScript first and then picking some existing AMP components based on your needs. These two steps can significantly reduce the amount of AMP validation errors you need to worry about.
Now that we’ve gone over the basics let’s tie it all together with a real-world example of AMP-first.
Case Study — Building AMP-First amp-wp.org
Until now, we discussed why AMP-first matters and the general development process to get there. In this section, we outline our first-hand experience of revamping amp-wp.org, keeping AMP-first in mind.
As we worked on an existing site with new design and feature development requirements, we started with the design phase.
The Design Process
A key benefit of using the AMP plugin’s Standard mode is that you do not need to create separate versions for AMP and non-AMP pages during the design process. In Standard mode, the AMP plugin serves AMP pages by default. It’s one interface design with one kind of performance across the board. Brands are free to design their web experiences as they usually would.
For amp-wp.org, we took inspiration from the parent project’s website, amp.dev. We created design mock-ups for standard WordPress page templates, including mobile and tablet views.
Apart from the creative freedom we took in the design stage, to ensure the AMP team gets content freedom, the design is developed using many custom Gutenberg blocks, which all play nicely with AMP.
The Development Process
Like most WordPress site building projects, AMP-first projects also begin with theme development, picking existing plugins, and then working on the custom development part as needed. We followed the same approach for this project:
Start with an AMP-ready theme
Although all WordPress default themes work out of the box, we chose _s (Underscore S) because we needed a theme that doesn’t add any design elements. Based on your needs, it is advisable to pick any AMP-compatible theme.
Using an AMP-compatible theme significantly reduces your efforts of making a non-AMP theme AMP compatible. If you need to start with a theme with AMP incompatibilities for some reason, try using that theme with the AMP plugin first. In most cases, the AMP plugin does an excellent job of making non-AMP things AMP-compatible seamlessly.
Use existing plugins for different functionalities
Next, we reviewed a few plugins, which the site has already installed. Notable ones included Atomic Gutenberg Blocks, Jetpack, Search with Google, PWA, Site Kit, Web Stories, and Yoast SEO. All of these are AMP compatible. There is a much bigger list of AMP-compatible plugins.
If you need any plugin which is not (yet) known to be AMP compatible, go ahead and try it out. As with non-AMP themes, the AMP plugin is likely to automatically handle most validation issues with non-AMP plugins.
Custom Development using AMP Components
We used some AMP components, as explained earlier, during our custom development.
amp-bind with amp-state
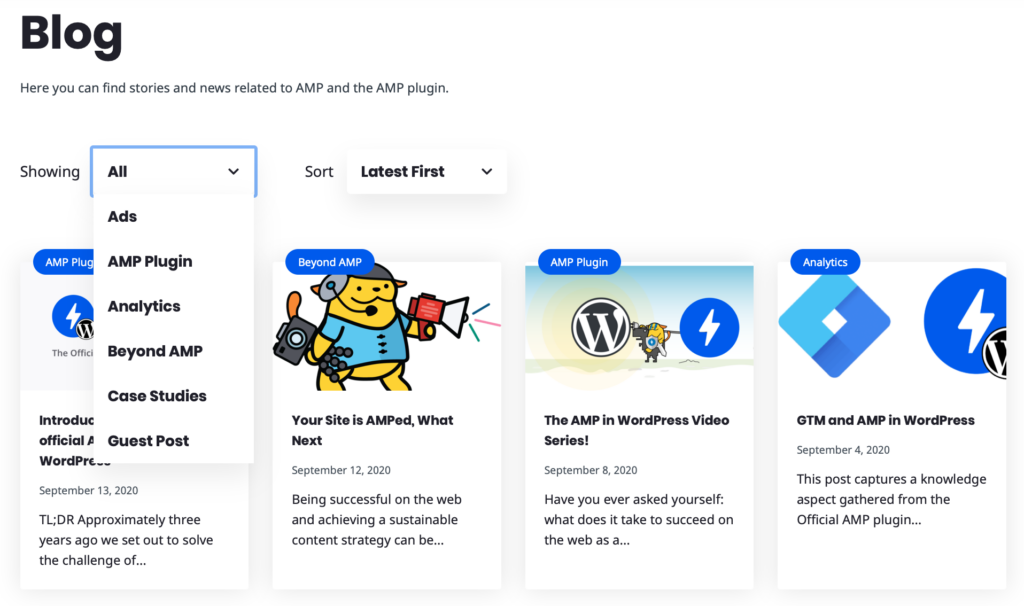
In some areas, such as Showcase and Blog, we needed a dropdown menu with filtering capabilities to quickly get to relevant content. We used a combination of amp-bind with amp-state for this.

amp-carousel
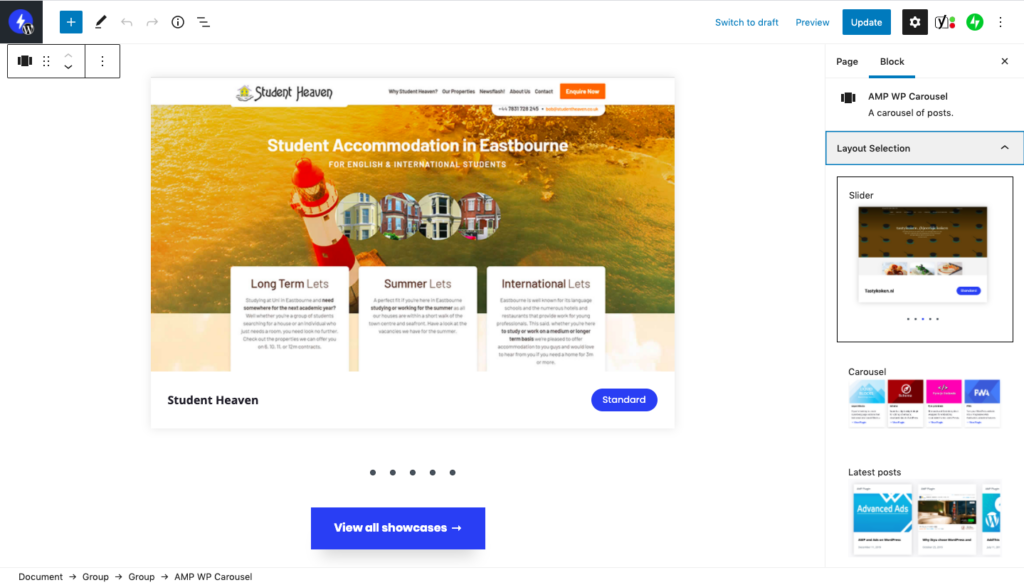
Gutenberg support is an important consideration, given that more than 57 million sites ship with it as the default editor. To achieve the Instagram-like touch carousel experience that our design called for, we developed a solution that was AMP-first and configurable through Gutenberg. We started with an amp-carousel as a base and wrapped the different options it provides in a custom Gutenberg block.


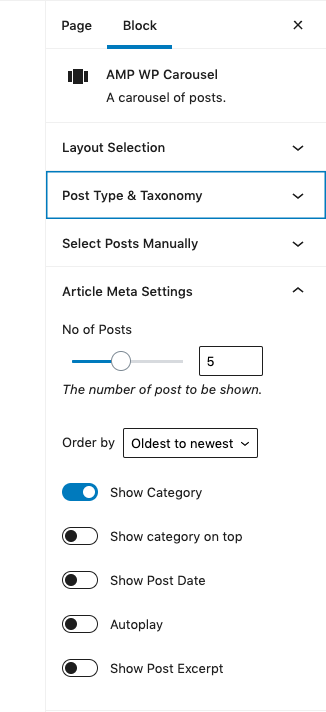
The backend of the AMP Post Carousel block with options such as Layout Selection, Number of Posts, Show Category, etc.

Frontend AMP Post Carousel result.
amp-autocomplete
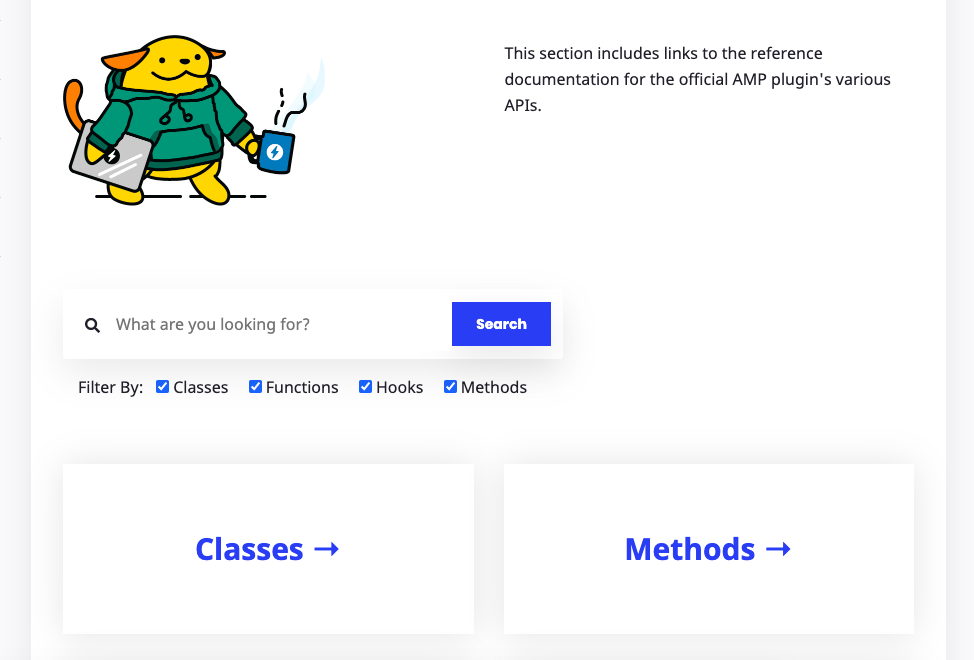
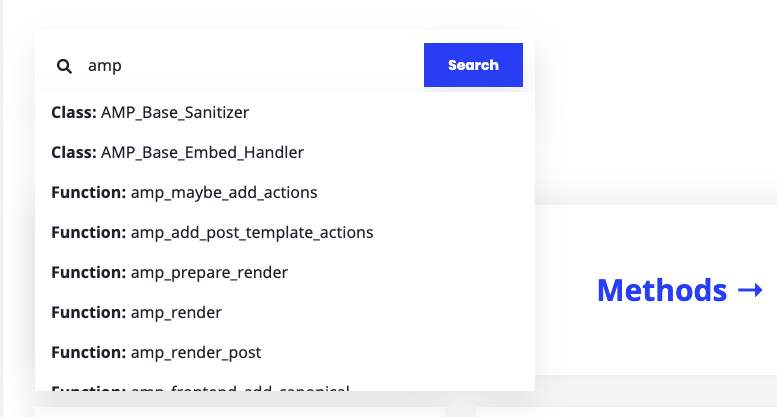
We implemented a custom search for AMP plugin reference documentation using WordPress’s default search and filtering documentation by content type: classes, functions, methods, and hooks. It also includes real-time autocomplete functionality. In this case, we used amp-autocomplete from the AMP Components library, with a couple of enhancements:
- A custom endpoint at /reference-autocomplete/ for better control over results and caching, in conjunction with
- amp-bind-macro to specify search query parameters, as defined by the user-facing “Filter By” option.


Moving things server-side
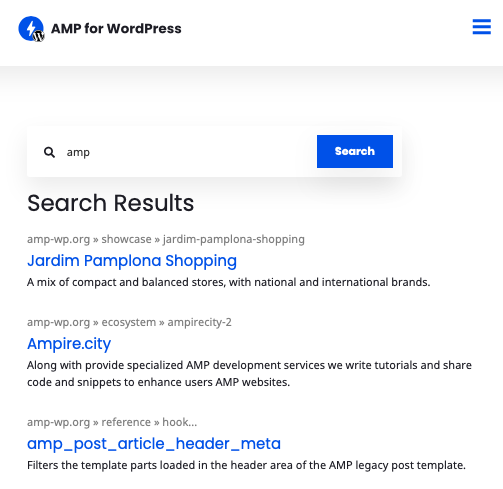
We also implemented a network-wide search powered by Google Programmable Search Engine (formally Custom Search Engine), which returns search results from the amp-wp.org, amp.dev, and blog.amp.dev domains. To do this, we created a custom plugin that renders results server-side, using Google’s Custom Search JSON API. The search results are AMP compatible, and the service fully replaces WordPress’s default search. This search plugin is available for anyone to use from the WordPress.org directory.
While in this case, we did not require to use a custom AMP component, the idea we want to highlight is that a few things can be made AMP-compatible by moving things server-side.

AMP and Javascript
An unfortunate misconception people have about AMP is that it doesn’t allow Javascript. Barring some restrictions designed to bring improved performance and security, AMP allows developers to run their JavaScript using amp-script.
We did not encounter any need to use amp-script as AMP components fulfilled all our requirements in this project. In a way, it shows the versatility of the AMP Component Catalogue. In any case, if you are a developer and would like to see amp-script in action, here is a code snippet from the popular plugin Newspack.
The Result: A Tangible Uplift In Metrics
While not perfect, we think you will be well satisfied with an AMP-first approach’s cumulative results. AMP Standard is a cost-effective way to build web experiences that are consistently fast, beautiful, and highly engaging across distribution platforms.
In the case of amp-wp.org, the metrics across Google Web Vitals, PageSpeed, and Lighthouse speak for themselves:
Web Vitals

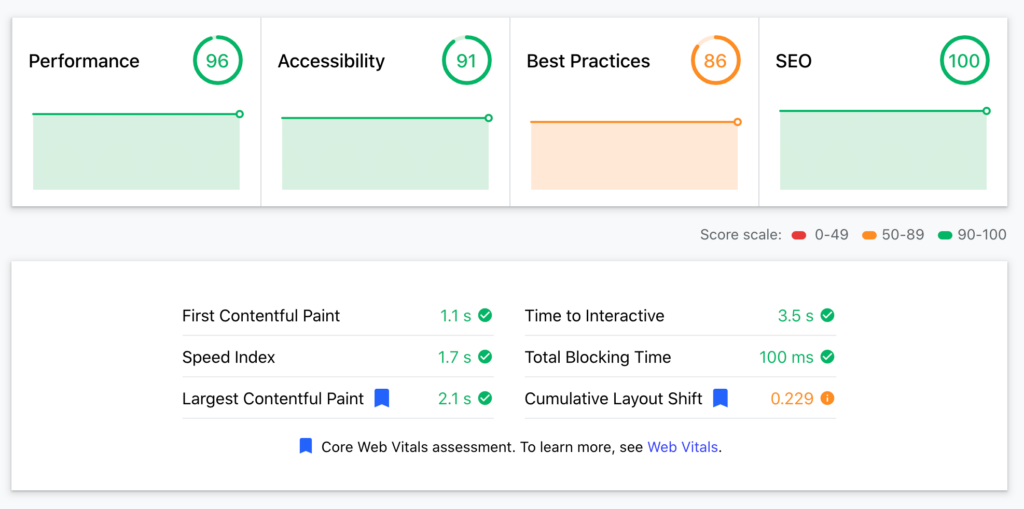
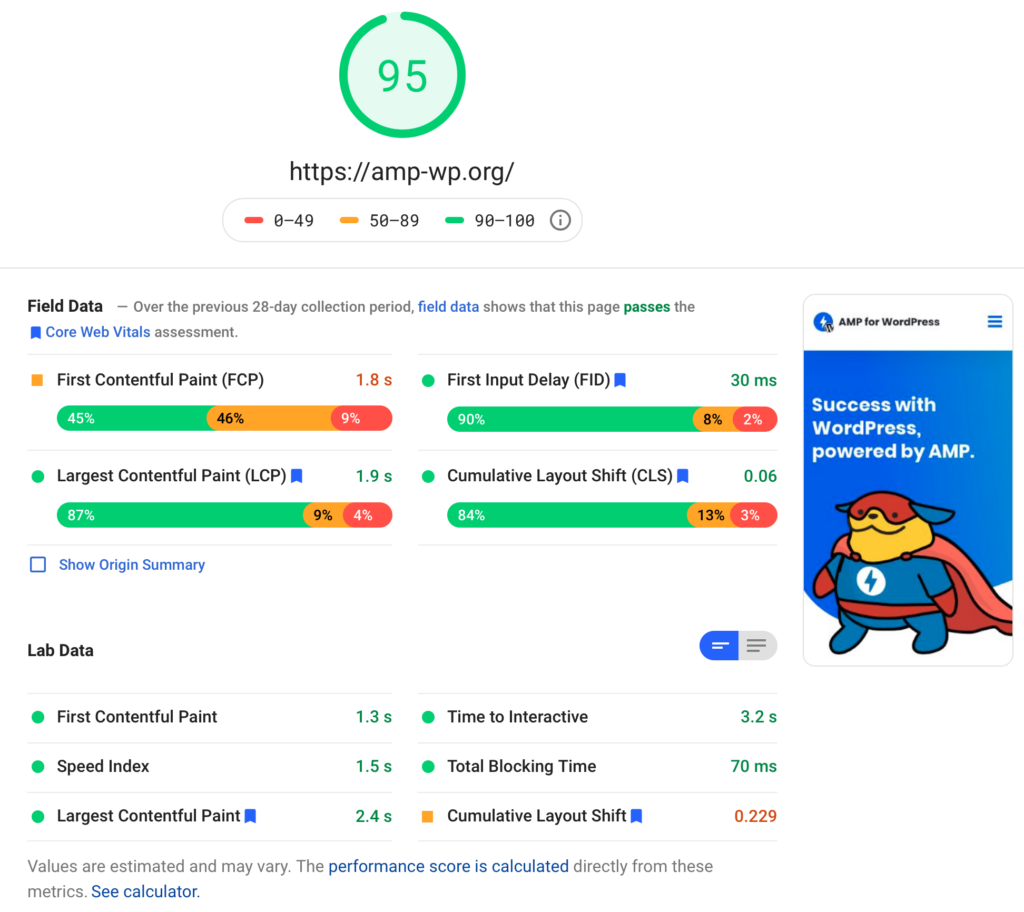
PageSpeed

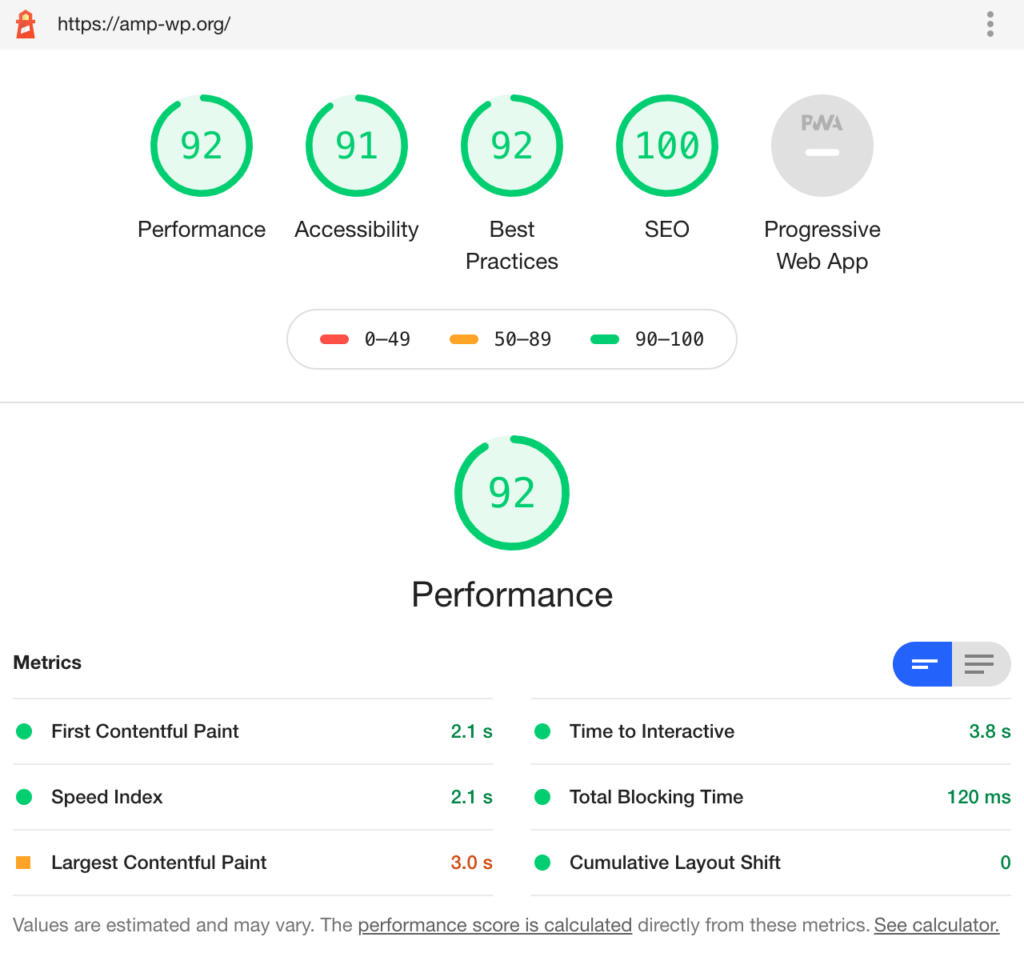
Lighthouse

For some reason, my AMP site is not hitting the green in the performance test. When you look into the details, the main causes are slowness of AMP scripts, etc.
Hi, please if you are still having issues with performance feel free to contact us at our support forum: https://wordpress.org/support/plugin/amp/
Beautiful✨ very nice😊